Binglong's space

Random notes on computer, phone, life, anything

Dodge Grand Caravan 2013 Coolant Thermostat Replacement for DTC P0128

Posted by binglongx on December 7, 2025

Introduction

The check engine light came on, and OBD code read DTC P0128. Quick googling shows that this is coolant (antifreeze) temperature not rising fast as expected. Possible reasons could be:

  • Stuck open thermostat (common). The thermostat sits between engine block and radiator. It is closed when coolant is cool (e.g. < ~200°F), so the engine would warm up the coolant inside engine block first. When the engine block is hot enough for best working condition, the thermostat opens up, water pump pushes the coolant through radiator and thermostat, then back to engine to cool down engine. If the thermostat is stuck open, coolant circulates through radiator before the engine is hot, causing P0128 DTC.
    • One way to confirm this problem is by looking at the water/coolant temperature meter at dashboard.
      • If thermostat works correctly, the temperature should rise to mid level (1/2) after a few minutes of engine running. Then thermostat would open. If you check underhood, before that time the coolant pipe coming from radiator to thermostat housing should stay cool, and after thermostat opening up, hot coolant would flow through radiator to the pipe, and you should feel it being hot.
      • If thermostat is stuck open, the water temperature may never come to mid-level. For my car, it never got over 1/4 level. This is therefore very likely the reason.
  • Faulty coolant temperature sensor (sometimes) or sensor connector. On the engine front near the battery, there’s temperature sensor the ECU reads to monitor coolant temperature. This connects to dashboard temperature meter, and is used by ECU to control cooling system. If this does not work, ECU gets wrong information and may cause P0128.
  • Air trapped in cooling system near thermostat causing it to malfunction (rare). This may be due to reservoir coolant running low, so cooling system sucks air into it.

First Try: Top Off Reservoir

For my car, I first checked the reservoir coolant level, and it was even lower than MIN. So I added coolant to the reservior to MAX with a funnel. This car uses MOPAR OAT coolant. I could not find exact coolant, so I used AutoZone universal OAT (yellow) 50/50. The coolant reservoir cap is near the battery. I cleared the DTC with OBD reader. After running the car for 20 miles or so, P0128 came back. Obviously, just adding coolant to reservoir did not fix the cooling system issue.

Second Try: Bleed Air

Changing either thermostat (with or without housing), or temperature sensor, is not trivial work. I’d like to try to bleed air from the cooling system, given that reservoir was too low and air might have been trapped.

The bleed screw is on the thermostat housing, which is on the engine block next to the air filter. I opened the radiator cap, and used a long phillips screw driver loosened the bleed screw by aboud 3 turns. Initially it spit some bubles, then quickly a small steady stream of coolant came out. The coolant level in radiator also dropped. I then tightened the bleeding screw, topped off the coolant at radiator with a funnel and capped it.

After running the car for 20 miles or so, P0128 came back. It was not caused by the small amout of trapped air.

Third Try: Replace Thermostat

Now it became serious work. There are plenty of YouTube videos on how to replace the thermostat/housing, and you can also ask ChatGPT to get a detailed list of steps to follow.

I ordered an after-market Dorman theremostat with housing and gasket ($18) and hose clamp pliers at Amazon. I also ordered an OSKYUO coolant temperature sensor ($9) and EPAuto Spill Proof Radiator Coolant Filling Funnel Kit, but it turned out unused.

Terse summary:

  • Make sure engine is off and cool.
  • Wear gloves to protect hands from scratching and toxic chemicals.
  • Unscrew 13mm nut holding steering fluid reservoir
  • Unlock 3 clamps locking upper half of air filter housing.
    • I tried to detach the big air hose from the housing, but in vain. Too tight. Not a problem to keep it there.
    • The PCV hose (small) is easy to detach.
  • Remove air filter (good chance to replace if too dirty). This gives the chance to inspect how to remove the lower half of the air filter housing. I wiggled it back and forth and it did not come off easily. Finally after I removed the air filter, I could see some plastic anchor latches at the housing bottom. Directing my force around that, the lower housing came off.
  • I used some wires/hooks to pull the upper housing and steering fluid reservoir away from obstructing the working area.
  • The thermostat housing is attached to the engine block with two 10mm screws. The lower screw is invisible and you have to hand feel it, and it’s a bit hard to access even with the air filter housing removed due to limited clearence. You must use the rachet with very short adaptor/extension (but not too short).
  • Put an oil drain pan under the car to catch coolant. ChatGPT says about 1 gallon of coolant may come out after detaching thermostat housing.
  • Unscrew the 10mm screws carefully with rachet. Once it’s loose, hand unscrew them. Pull the thermostat housing off engine carefully. Coolant would leak from the engine block. It turns out to be about half gallon or so coming out.
  • I tried to detach the radiator hose from the theremostat housing. Even with a hose clamp pliers opening the clamp, and using a screw driver to peel the hose from housing, I could only turn the housing around hose, but it would not come off. Too tight.
  • So I gave up on that, and instead just replaced the thermostat only. In the new housing, use pliers to turn the holding lock counterclockwise, so it comes off with the spring, then just take the thermostat. Similarly do the same on the old housing to remove thermostat. Be care to hold the spring so it does not shoot away. I only swapped the thermostat, and reuse the old spring and lock, because the new lock does not seem to fit very well in the old housing.
  • Push the thermostat housing the engine block, and tighten the two 10mm screws. Do not overtighten, or the plastic housing can break.
  • Move the hose clamp to the original location and unlock the hose clamp pliers. This makes sure it does not leak.
  • Bleed air and add coolant. Loosen the bleed screw by 3 turns, and add coolant to radiator. The air comes out and after a while the steady stream of coolant comes out. Then tighten bleed screw.
  • I used a funnel to rinse the messy coolant around the thermostat housing and below with clean water.
  • Install the air filter housing and air filter, and the steering fluid reservoir.
  • Add coolant to top of the radiator. It may burp, just add more coolant then.
  • With radiator cap open, turn on engine. The radiator coolant level may rise and overflow. It may also burp. If the coolant level drops, add more coolant.
  • I ran the engine for about 15 minutes and the temperature reached mid-level. This was a good sign. Then obivously the theremostat opened, because I saw the coolant level drop a lot at radiator (before that it just overflew and burped intermittently). After running engine for 10 more minutes, with more burps, overflow, and adding more coolant, I capped the radiator cap and turned off engine. The coolant temperature has been quite steady at min level.
  • Clean the DTC code.
  • That’s it for the day. I will check later after running the car on road, for radiator level (when cool), reservoir level, and DTC.

Pictures

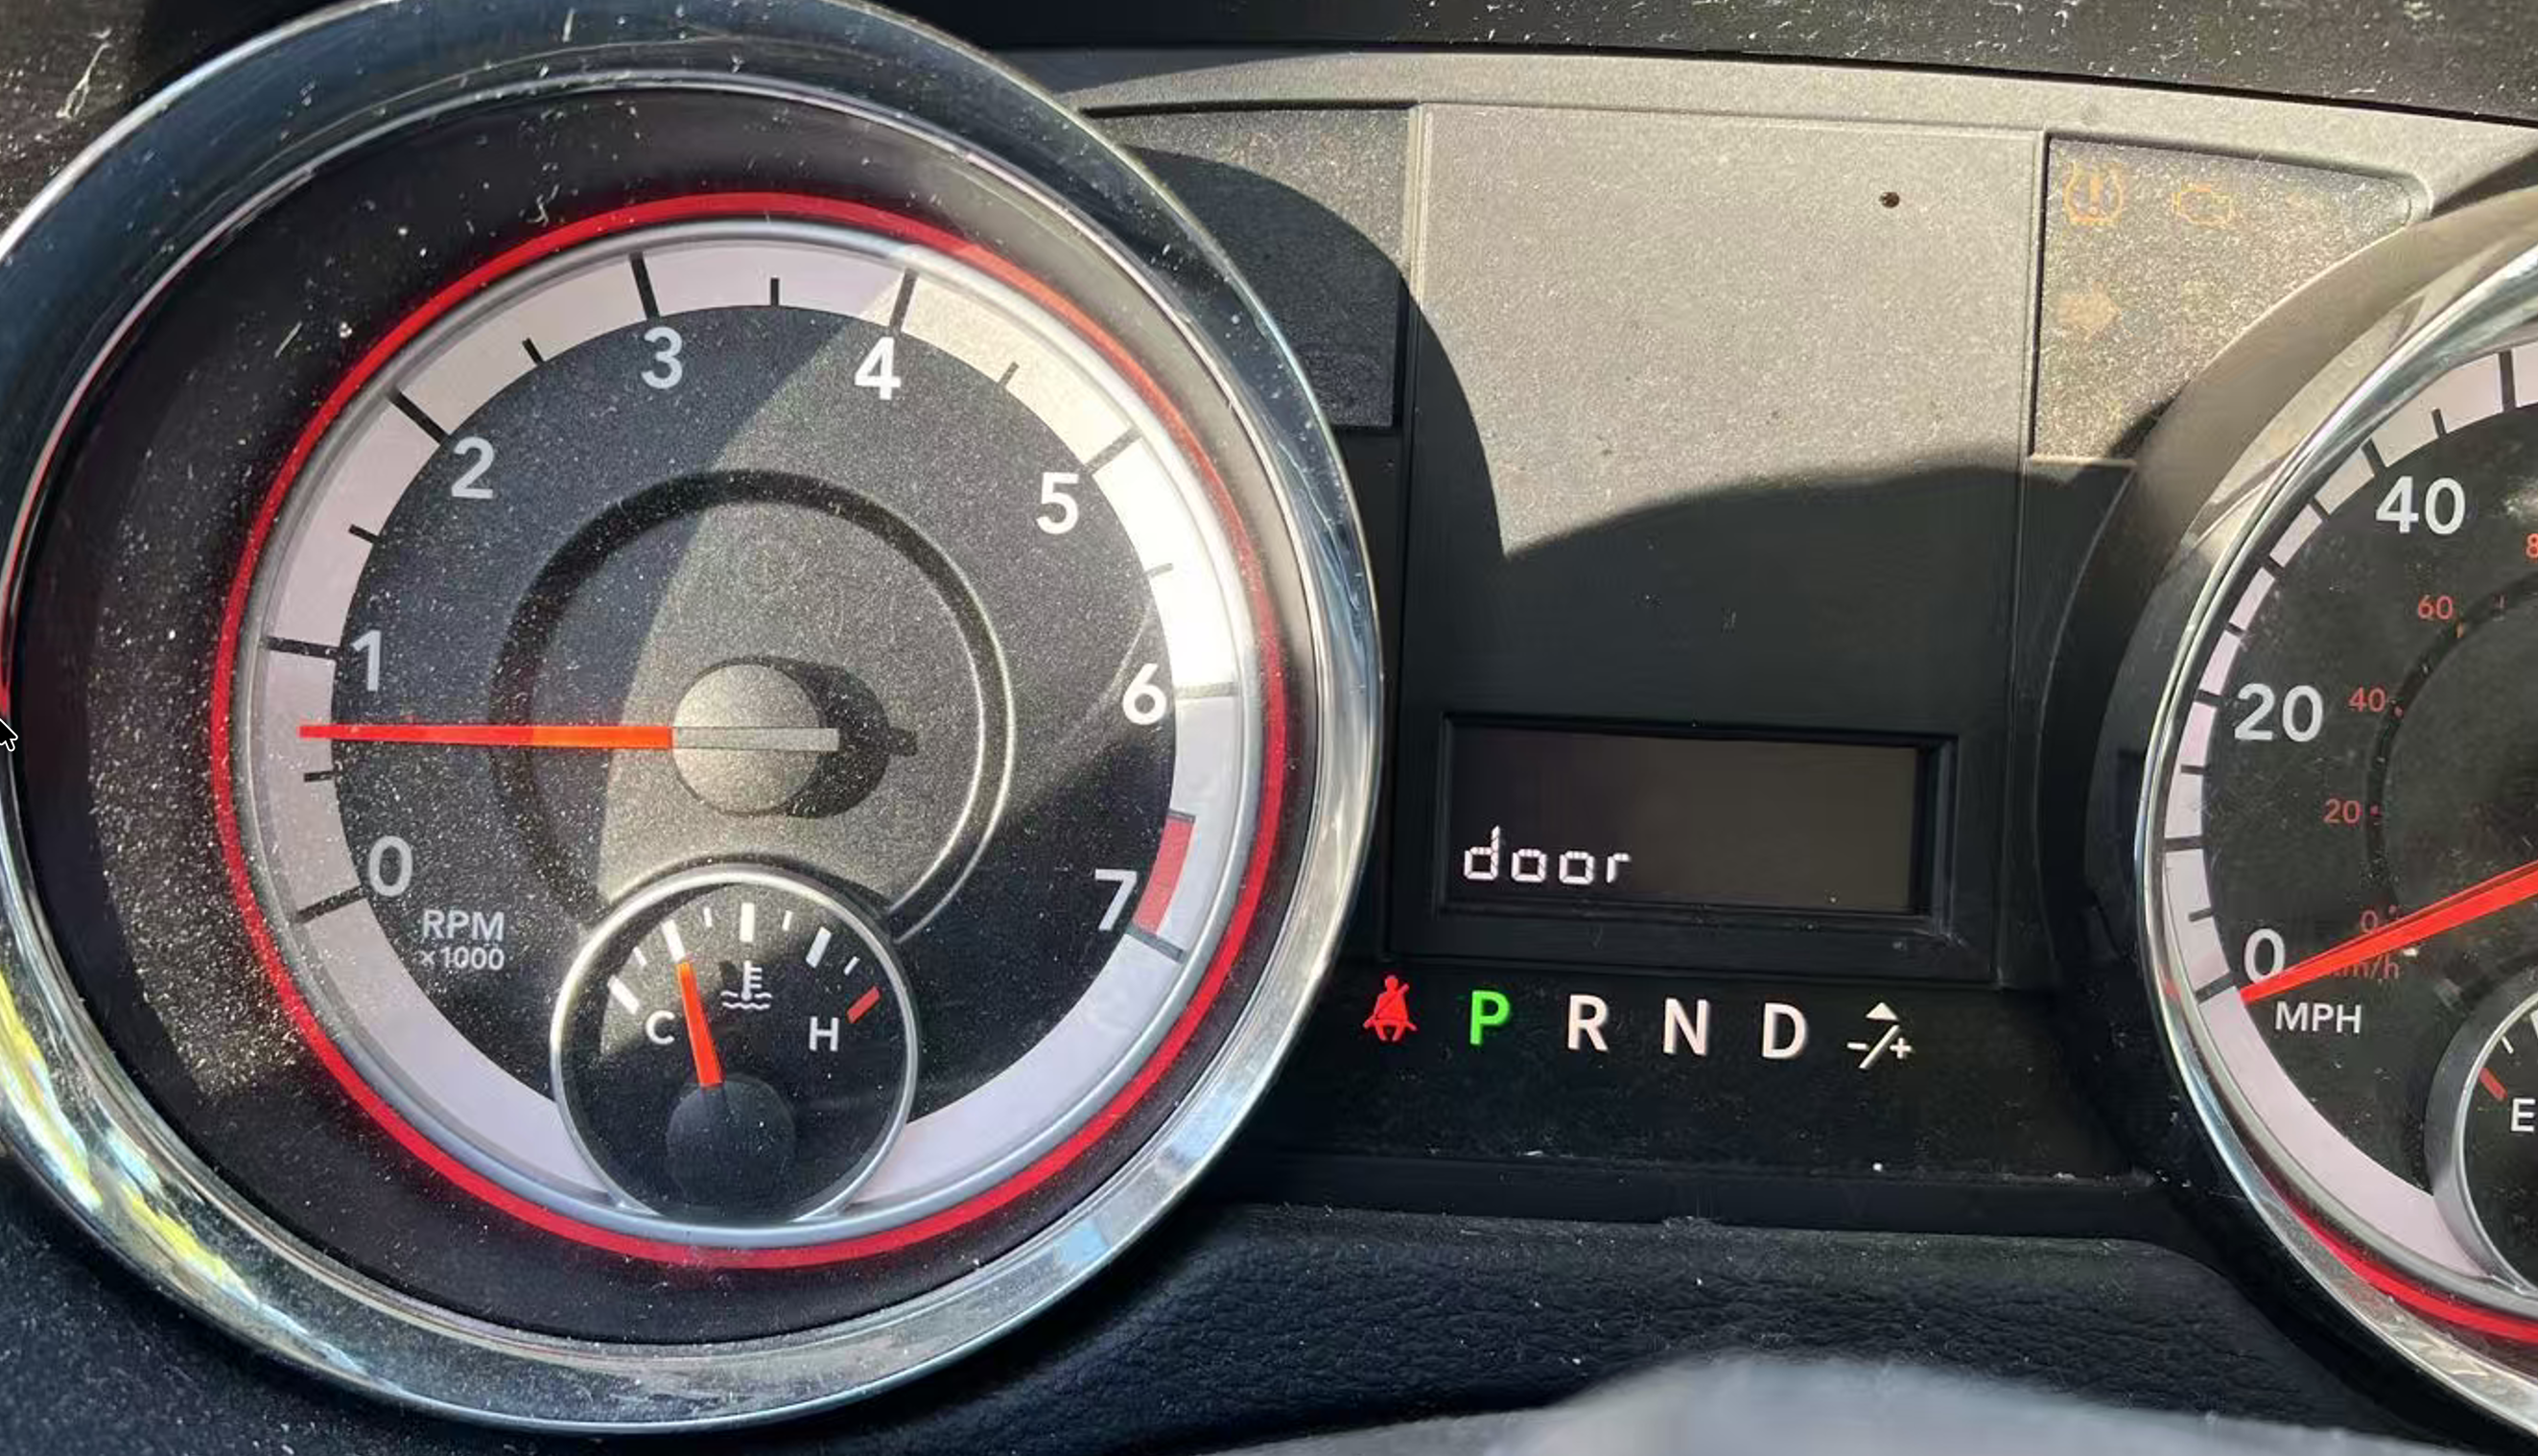
Above: only reaching 1/4 of water temperature meter is problematic. Stable running engine should see about 1/2 level.

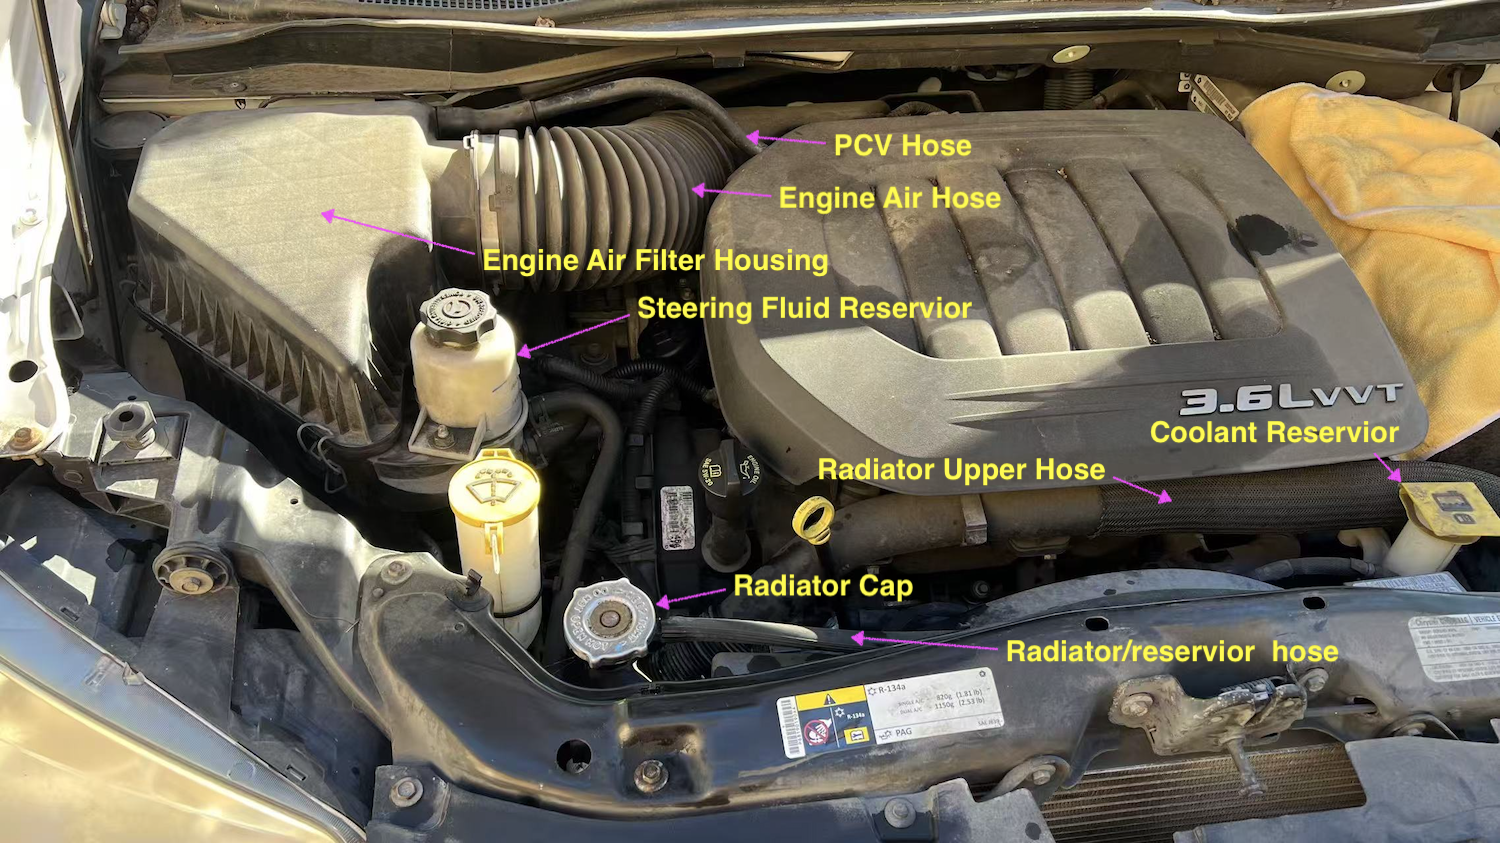
Above: what’s under the hood.

Above: propping and hooking for easier access to the thermostat housing.

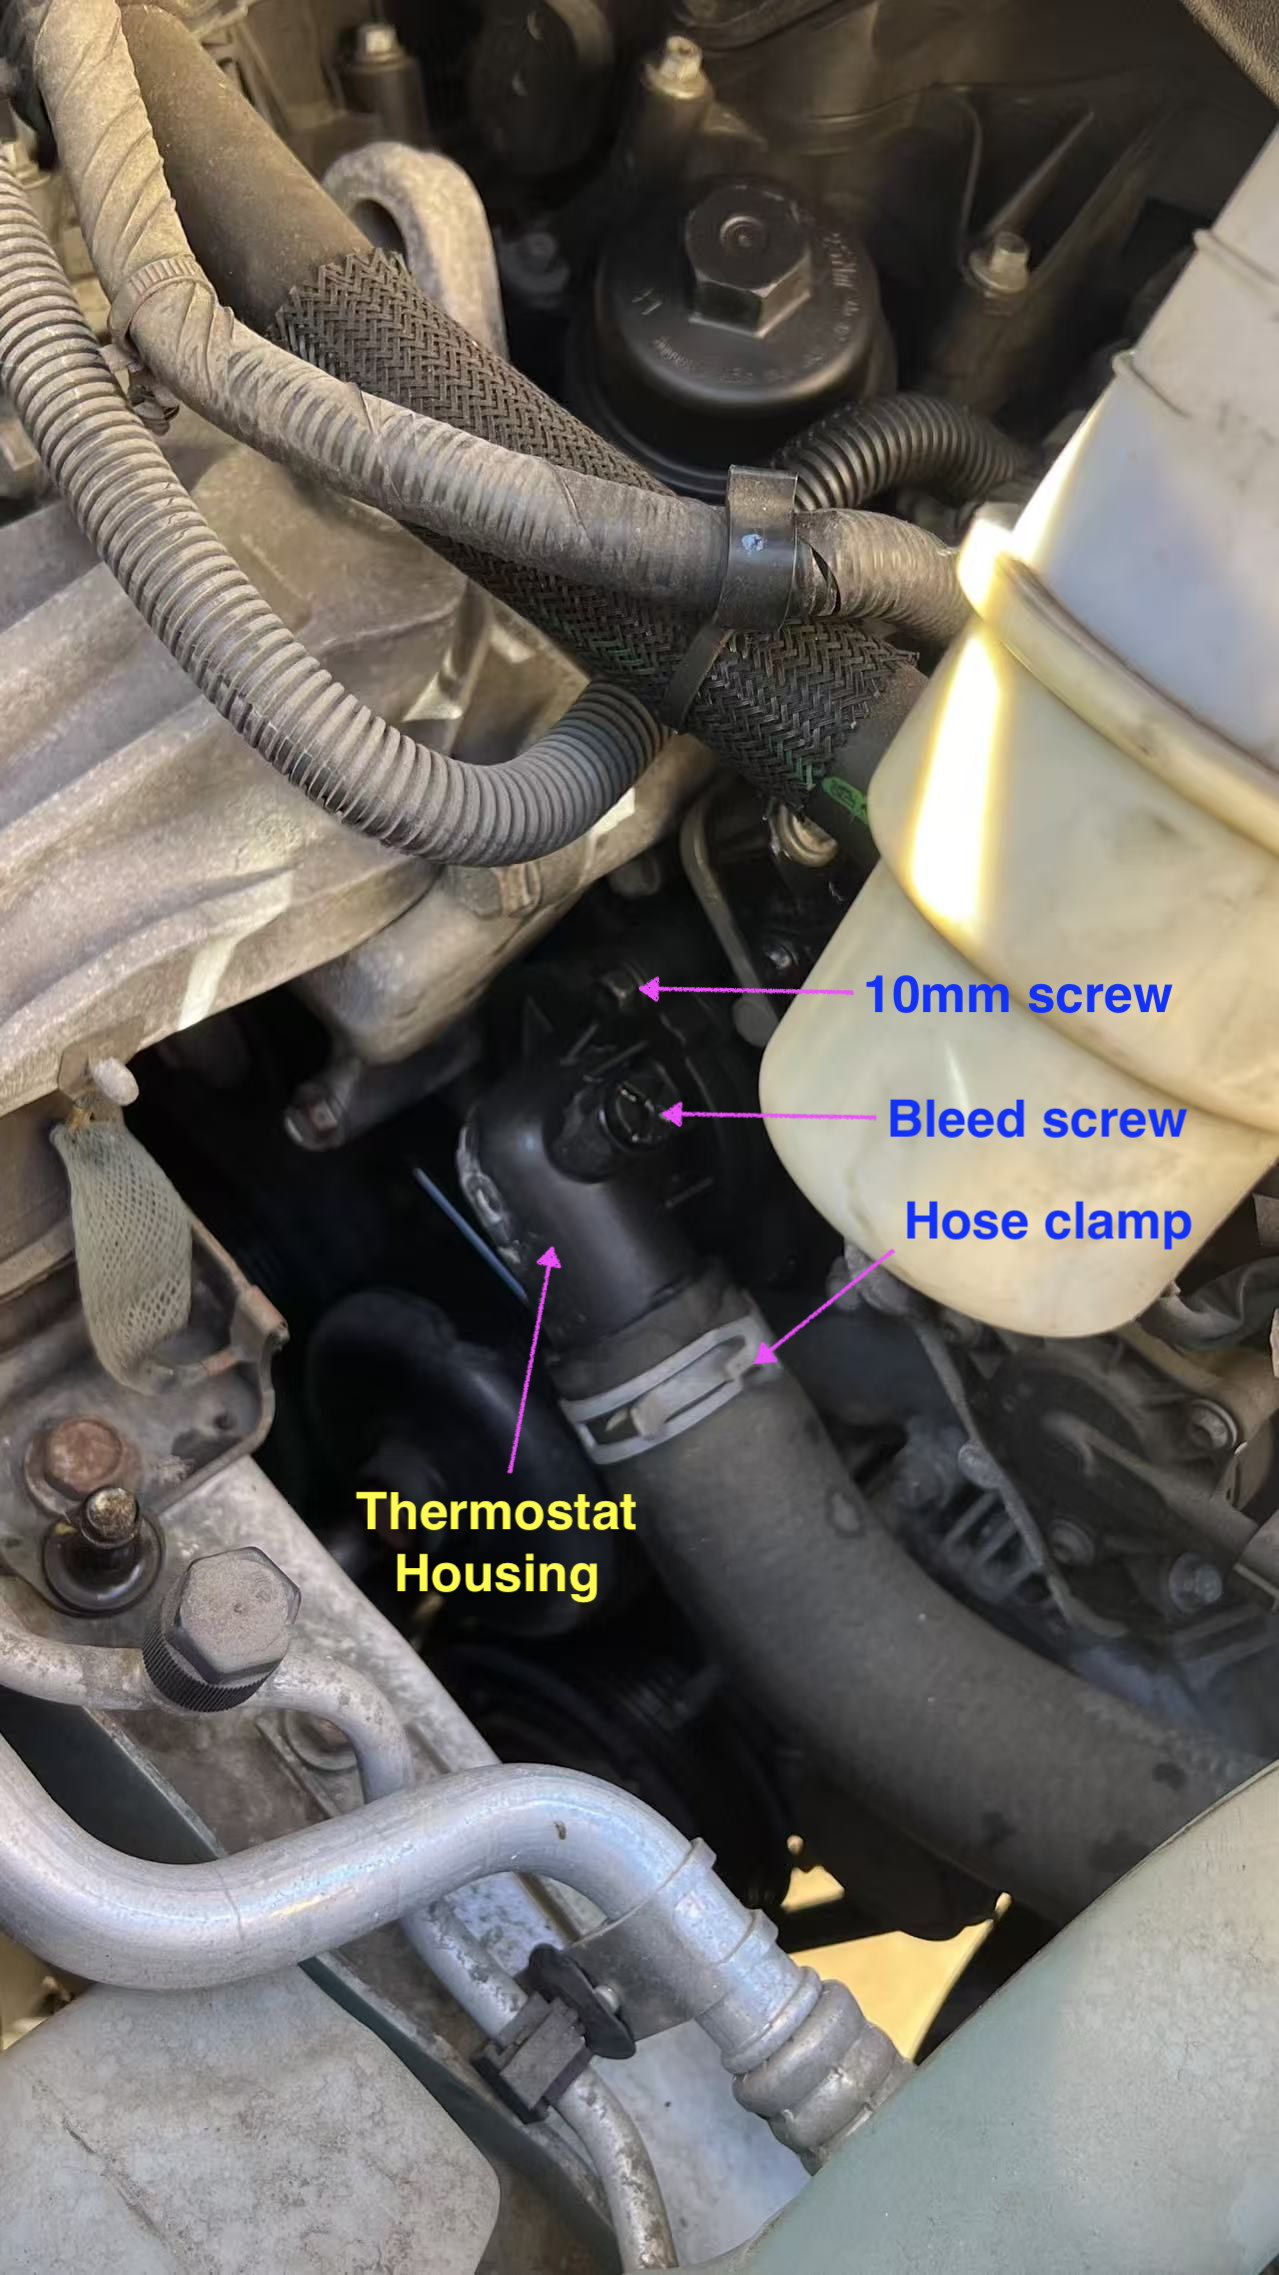
Above: close up on the thermostat housing.

Above: new thermostat (inside spring coil), spring coil, metal lock, and plastic housing. Also notice the phillips bleed screw.

Posted in Car | Tagged: , , , , , , , , , , , , , , | Leave a Comment »

Resource Pool: Memory Pool etc

Posted by binglongx on August 8, 2025

If the model is that you keep tight control of the resources all the time, and only let the client gain access for some time period, you might do something like this:

#include <memory>   // std::unique_ptr
#include <vector>   // std::vector
#include <utility>  // std::swap, std::move
#include <cassert>  // assert


template<typename T> class Pool;

// represent reference to an object in pool 
template<typename T> class PooledObjectRef {
public:
    // empty
    PooledObjectRef() {}
    
    // move
    PooledObjectRef(PooledObjectRef&& other)
    : PooledObjectRef() {
        swap(other);
    }
    PooledObjectRef& operator = (PooledObjectRef&& other) {
        swap(other);
        return *this;
    }

    // cannot copy
    PooledObjectRef(const PooledObjectRef& other) = delete;
    PooledObjectRef& operator = (const PooledObjectRef& other) = delete;

    // has resource or not
    operator bool() const {
        return resource_ != nullptr;
    }
    
    // access the real resouce
    T& operator*() {
        return *resource_;
    }
    const T& operator*() const {
        return *resource_;
    }

    // return resource to pool
    void recycle();
    
    // automatically recycle
    ~PooledObjectRef() {
        recycle();
    }
    
public:
    void swap(PooledObjectRef& other) {
        std::swap(pool_, other.pool_);
        std::swap(resource_, other.resource_);
    }
    
private:
    friend class Pool<T>;
    
    PooledObjectRef(Pool<T>* pool, T* resource)
    : pool_(pool), resource_(resource) {
    }
    
    void wipe() {
        pool_ = nullptr;
        resource_ = nullptr;
    }
    
private:
    Pool<T>*    pool_ = nullptr;
    T*          resource_ = nullptr;
};

// manage a pool of resources
template<typename T> class Pool {
public:
    template<typename... ARGS>
    Pool(size_t n, ARGS&&... args) {
        for(size_t i = 0; i < n; ++i) {
            free_.push_back(std::make_unique<T>(std::forward<ARGS...>(args)...));
        }
    }
    
    PooledObjectRef<T> acquire() {
        if( not free_.empty() ) {
            used_.push_back( std::move(free_.back()) );
            free_.pop_back();
            return PooledObjectRef<T>{this, used_.back().get()};
        }
        return {};
    }
    
    bool recycle(PooledObjectRef<T>& obj) {
        if( obj.pool_ == this ) {
            auto it = std::ranges::find_if(used_, [&obj](auto& p) {
                return obj.resource_ = p.get();
            });
            if( it != free_.end() ) {
                free_.push_back( std::move(*it) );
                used_.erase(it);
                obj.wipe();
                return true;
            }
            else {
                assert(false);  // coding error
            }
        }
        else {
            assert(false);  // pass in object from different pool.
        }
        return false;
    }
    
    size_t available() const {
        return free_.size();
    }

    bool empty() const {
        return available() == 0u;
    }

private:
    std::vector<std::unique_ptr<T>> free_;
    std::vector<std::unique_ptr<T>> used_;
};

template<typename T>
inline void PooledObjectRef<T>::recycle() {
    if( pool_ ) {
        [[maybe_unused]] bool ok = pool_->recycle(*this);
        assert(ok); // should never fail
    }
}

int main() {
    Pool<int> pool(2, 42);

    assert(pool.available() == 2);
    {
        auto ptr = pool.acquire();
        assert(ptr && *ptr == 42);
        assert(pool.available() == 1);
    }
    assert(pool.available() == 2);
    {
        auto ptr = pool.acquire();
        assert(ptr && *ptr == 42);
        assert(pool.available() == 1);
        ptr.recycle();
        assert(not ptr);
        assert(pool.available() == 2);
    }
    assert(pool.available() == 2);
    {
        auto ptr = pool.acquire();
        assert(ptr && *ptr == 42);
        assert(pool.available() == 1);
        pool.recycle(ptr);
        assert(not ptr);
        assert(pool.available() == 2);
    }
    assert(pool.available() == 2);

    {
        auto ptr1 = pool.acquire();
        assert(ptr1);
        auto ptr2 = pool.acquire();
        assert(ptr2);
        assert(pool.empty());
        auto ptr3 = pool.acquire();
        assert(not ptr3);
    }

    return 0;
}

Posted in C++ | Tagged: , , , , , | Leave a Comment »

XNU, Darwin, macOS/iOS/visionOS/watchOS/tvOS

Posted by binglongx on July 8, 2025

BriefDescriptionComponentsHistoryOther
XNUOS kernelHybrid kernel design with microkernel and monolithic kernel– Mach/OSFMK: task management, IPC(Mach ports…), scheduling etc;
– BSD: Unix APIs, file systems, network stack, user permission, etc;
– IOKit: object-oriented C++ drivers
originally part of NeXTSTEPOpen source
DarwinCore of OSXNU + core Unix utilities + low-level system frameworks– XNU: kernel;
– BSD userland
– libSystem: libc, libpthread, libm, etc;
– launchd: service manager;
– DriverKit/IOKit: frameworks to write drivers, in kernel (IOKit) or user space (DriverKit)
combines NeXTSTEP, Mach 3.0 and FreeBSD components.Open source
macOS/iOS/visionOS/watchOS/tvOS/…Full Unix-like OSFull OS for general end users– Darwin: core;
– Apple frameworks: Cocoa, Metal, etc;
– GUI;
– system apps: Safari, Finder etc.
Closed source

Links:

Posted in Computer and Internet | Tagged: , , , , , , , , | Leave a Comment »

C++ Name Mangling in GCC

Posted by binglongx on March 17, 2025

Introduction

When you link a C/C++ program, the linker has to resolve symbols referring to functions or variables provided in other modules.

The symbols are names (see also Symbols and C++ Linkages). Here we are more intersted in function names.

  • In the C world, there is no function overloading, so each function will have unique name.
  • In C++, functions can be overloaded, and they can be differentiated by different parameter types (but not return type). C++ also has namespaces. Return type is ignored.

For linker to find the correct function, symbol therefore needs to encode both function name and parameter types in C++. Function name may nest in namespaces as well.

C++ uses mangling to encode the information and can result in funny-looking symbol names. Sometimes, you may see link or run-time link errors like unresolved symbols with weird names. They are often just mangled function names. They can be absurdly long if templates are involved.

Parts of Function Name

A general C++ function looks like:

return_type [namespaces]function_name[template_arguments](parameters)[qualifiers]

  • return_type: return type of function. Mangling does NOT care return_type.
  • namespaces: optional, if the function lives in a namespace, or as a class method.
    • For mangling purpose, a class method is a namespaced function. Obviously compiler-generated call site already inserted a this parameter as first function parameter when seeing non-static method prototype at compile time.
  • function_name: obvious. Note that there are special functions like operators, constructors etc.
  • template_arguments: if the function is an instantiation of a function template, the template arguments exist.
  • parameters: the list of parameter types. void is silently added if there is no parameters.
  • qualifiers: optional. If function is a class method, this differentiates constant, volatile or reference properties of the object the method works on.

Mangling

Mangling of a C++ function works as follows in GCC Itanium ABI.

High Level

In simplified fashion, at high level:

  • return_type: ignored
  • _Z: all mangled C++ name starts with _Z.
  • if it has namespaces:
    • N: marks start of nesting
    • Each namespace in the list is then encoded as a name or type_name
    • function_name
    • E: end of name
  • else local scope:
    • Z: marks start of local scope nesting (function local objects, lambda etc)
    • encode local entities
    • E: end of name
  • else: just encode the function name.
  • template argument list:
    • I for <
    • types are encoded as type_names
    • E for >
  • paramters: types are encoded as list of type_names
  • qualifiers: special abbreviations for constness, volatile and references etc.

Name

Some examples of namespace or class or function name:

  • Regular name: number_of_characters name_string
    • number_of_characters is needed to know when the name ends.
    • E.g. 3foo for foo.
  • Special names/expressions, e.g.:
    • C1: constructor
    • D1: destructor
    • lt : operator <
    • cl : operator ()
  • Substitutions, e.g.:
    • St: for ::std::

Type

Types can appear in various parts of mangled symbol name, e.g. function parameter list, template argument list, and namespaces. Some examples:

  • built-in types. E.g.:
    • v for void
    • b for bool
    • i for int
    • j for unsigned int
    • f for float
    • d for double
  • Type modifiers, e.g.:
    • P<type> for <type>*
    • R<type> for <type>&
    • O<type> for <type>&&
  • class: encode the class as name
  • template parameters: encode as template argument list.
  • Substitutions: short names for often used types, e.g.:
    • Sa: for ::std::allocator
    • Sb: for ::std::basic_string
    • Ss: for ::std::string
    • Si: for ::std::istream
    • So: for ::std::ostream
    • Sd: for ::std::iostream

Qualifier

Examples (see also type modifiers above):

  • K : const
  • R : &
  • O : &&

Examples

Here are some examples using Apple Clang 17.0. Note that it uses an extra leading _ for names.

You can use the following commands to try on macOS:

gcc test.cpp
nm a.out
c++filt

gcc builds the C++ program and produces an executable, by default named as a.out.

nm prints the symbols in the executable.

Feed c++filt with the mangled name, and it prints demangled name.

You could also demangler.com to demangle a name online.

C functions

No mangling. Use extern "C" if compiled with C++ compiler.

void foo(bool, int);   // _foo
void bar(bool, int*);  // _bar

C++ overloads

The parameter difference causes mangled name to differ.

float foo(bool, int);   // foo(bool, int)  : __Z3foobi
float foo(bool, int*);  // foo(bool, int*) : __Z3foobPi

Namespace / class scope functions

namespace foo{ void func(int); } // foo::func(int) : __ZN3foo4funcEi
struct bar{ void func(int); };   // bar::func(int) : __ZN3bar4funcEi

namespace std {
    struct __exception_ptr {
        struct exception_ptr {
            void _M_addref() {} // std::__exception_ptr::exception_ptr::_M_addref()
                                // __ZNSt15__exception_ptr13exception_ptr9_M_addrefEv
        };
    };
}

Note that St substitutes ::std::.

Local scope lambdas

C++ lambda creates an unnamed class that has an operator() method (const by default). That method is a function potentially having big chunk of machine code, therefore needs a symbol to link. So the symbol for the closure is also mangled.

Note that the symbol is for the operator() method of the unnamed class of the lambda.

int foo(int i) {
    auto lambda1 = [](bool b) {  // foo(int)::$_0::operator()(bool) const
        return b? 42 : 0;        // __ZZ3fooiENK3$_0clEb
    };
    auto lambda2 = [&i](int a) { // foo(int)::$_1::operator()(int) const
        return a + i;            // __ZZ3fooiENK3$_1clEi
    };
    return lambda1(i>0) + lambda2(22);
}

The mangled names show that lambda classes are named as $_0, $_1 etc in the local scope foo(int), i.e., Z3fooiE. The symbol refers to the class’s constant call operator $_1::operator() const like K3$_0cl.

Complex Example

Try to demangle this:

__ZNO2ns3FooINSt3__112basic_stringIcNS1_11char_traitsIcEENS1_9allocatorIcEEEEiE8getMagicILb1EEEid

It looks scary.

The code generating this symbol is as follows:

#include <string>

namespace ns {
template<class T, class U>
struct Foo {
    template<bool FLAG>
    int getMagic(double v) && {
        return 42 + FLAG + int(v);
    }
};
}

int main() {
    return ns::Foo<std::string, int>{}.getMagic<true>(3.14);
}

My interpretation is:

__ZNO2ns3FooINSt3__112basic_stringIcNS1_11char_traitsIcEENS1_9allocatorIcEEEEiE8getMagicILb1EEEid
int ns::Foo<std::__1::basic_string<char, std::__1::char_traits<char>, std::__1::allocator<char> >, int>::getMagic<true>(double) &&

                                        // __Z
int                                     // i (move to bottom)
                                        // N
                                        //   (O) moved from bottom
ns::Foo                                 //   2ns3Foo
<                                       //   I
                                        //     N
    std::__1::                          //       St3__1
    basic_string                        //       basic_string
    <                                   //       I
        char,                           //         c
                                        //         N
        std::__1::                      //           S1_
        char_traits                     //           11char_traits
        <                               //           I
            char                        //             c
        >,                              //           E
                                        //         E
                                        //         N
        std::__1::                      //           S1_
        allocator                       //           9allocator
        <                               //           I
            char                        //             c
        >                               //           E
                                        //         E
    >,                                  //       E
                                        //     E
    int                                 //     i
>::                                     //   E
getMagic                                //   8getMagic
<                                       //   I
                                        //     L
true                                    //       b1
                                        //     E
>                                       //   E
                                        // E
                                        // (i) (move from top)
(double)                                // d
&&                                      // O (move to top)

Run-time Demangling

You can call __cxa_demangle() to demangle a name at run-time.

#include <iostream>
#include <cstdlib>
#include <cxxabi.h>

int main() {
    const char* mangled_name 
        = "_ZNO2ns3FooINSt3__112basic_stringIcNS1_11char_traitsIcEENS1_9allocatorIcEEEEiE8getMagicILb1EEEid";
    int status;
    char* demangled_name = abi::__cxa_demangle(mangled_name, nullptr, nullptr, &status);

    if (status == 0 && demangled_name != nullptr) {
        std::cout << "Demangled name: \n" << demangled_name << std::endl;
        std::free(demangled_name); // Free the allocated memory
    } else {
        std::cerr << "Demangling failed with status: " << status << std::endl;
    }
    return 0;
}

The AI generated code above prints:

Demangled name: 
int ns::Foo<std::__1::basic_string<char, std::__1::char_traits<char>, std::__1::allocator<char> >, int>::getMagic<true>(double) &&

References

Posted in C++ | Tagged: , , , , , , , , | Leave a Comment »

Migrate To A New iPhone

Posted by binglongx on February 8, 2025

After you buy a new iPhone or otherwise get a different fresh iPhone, you will need to smoothly move the data from your current iPhone to this new iPhone. Apple Quick Start makes this very easy.

Important: Before you start, make sure your current iPhone is using the latest iOS to reduce the change of migration failure. You can do so by go to Settings -> General -> Software Update. You don’t need to worry about the new iPhone: If the new iPhone does not have latest iOS, it may automatically perform software update in the early stage of migration, for example after it gets WiFi connnection information from your current iPhone.

You can migrate from current iPhone to new iPhone wirelessly through WiFi, or wired through a cable. Depending on your iPhone models, you may need to use a USB-C to USB-C cable, Lightning to USB-C cable, or Lightning to Adaptor to Lightning set-up.

If possible, I would recommend a wired connection for data migration. Even the slow Lightning to USB-C cable can do 480Mbps. Although your WiFi may boast a faster speed, in practice it is often slower due to interference with your neighbor’s WiFi and room wall attenuation, and may also be less reliable.

Posted in Life, Smart Phone | Tagged: , , , , , | Leave a Comment »

Apple SIMD Vector and Matrix

Posted by binglongx on February 5, 2025

Include

Include for both C and C++ users:

#include <simd/simd.h>

C Users

Vector Types

C vector type example (see <simd/vector_types.h>):

simd_float3     // 3x1 column vector of float elements

If you look further, the vector is a Clang/GCC extension for SIMD architecture like AVX/Neon/OpenCL:

/*! @abstract A vector of three 32-bit floating-point numbers.
 *  @description In C++ and Metal, this type is also available as
 *  simd::float3. Note that vectors of this type are padded to have the same
 *  size and alignment as simd_float4.                                        */
typedef __attribute__((__ext_vector_type__(3))) float simd_float3;

You can regard it as an array of >= N elements that would fit into a SIMD wide register. 

The compiler has built-in support for:

  • Basic arithmetic operators for lanewise operations (vector-vector, and vector-scalar);
  • [i] to access i-th element;
  • .x.y.z.w , .xy etc. to access the elements.

Matrix Types

C matrix type example (see <simd/types.h>):

simd_float3x3  // 3x3 matrix of float elements

If you look further, the matrix is simply implemented as an array of columns:

/*! @abstract A matrix with 3 rows and 3 columns.                             */
typedef struct { simd_float3 columns[3]; } simd_float3x3;

Storage wise, the matrix is column major. Conceptually you use it as matrix without needs to care the storage format.

This also means you can access the column vectors easily, like

simd_float3x3 m;
simd_float3 column0 = m.columns[0];
simd_float3& column1 = m.columns[1];

There is no easy way to access a row vector or sub-matrix.

Vector Construction

Examples:

simd_double3 d3{1.0, 2.3, 4.5};                 // direct initialization
simd_float3 f3 = simd_make_float3(1, 2, 3.14f); // helper function
simd_float4 f4 = simd_make_float4(f3, 1);       // helper function

Matrix Construction

Direct initialization in column major:

simd_double3x3 d3x3{{
    {1, 0, 0}, // column 0
    {0,-1, 0}, // column 1
    {0, 0,-1}, // column 2
}};

Initialization with column vectors:

simd_float3x3 f3x3{
    simd_float3{1, 2, 3}, // column 0
    simd_float3{4, 5, 6}, // column 1
    simd_float3{7, 8, 9}, // column 2
};

Or as convenience, initialization with vectors for rows through a helper function:

simd_float3x3 f = simd_matrix_from_rows(
    simd_float3{1, 2, 3}, // row 0
    simd_float3{4, 5, 6}, // row 1
    simd_float3{7, 8, 9}  // row 2
);

Another example to construct a 4×4 transform matrix from 3×3 rotation matrix and 3×1 vector:

simd_float3x3 R;
simd_float3 t{1, 2, 3};
simd_float4x4 T{
    simd_make_float4(R.columns[0], 0), // column 0
    simd_make_float4(R.columns[1], 0), // column 1
    simd_make_float4(R.columns[2], 0), // column 2
    simd_make_float4(t, 1),            // column 3
};

Matrix Operations

Matrix operations can be found in <simd/matrix.h>, for example:

simd_float3 v1{1, 2, 3};
simd_float3x3 m1;
simd_float3 v2 = simd_mul(m1, v1);   // matrix * vector
simd_float3x3 m2;
simd_float3x3 m3 = simd_mul(m1, m2); // matrix * matrix

C++ Users

Vector Types

C++ vector type example (see <simd/vector_types.h>):

simd::float3     // 3x1 column vector of float elements

If you look further, it is just a synonym of the C type:

namespace simd {
    /*! @abstract A vector of three 32-bit floating-point numbers.
     *  @description In C or Objective-C, this type is available as
     *  simd_float3. Vectors of this type are padded to have the same size and
     *  alignment as simd_float4.                                               */
    typedef ::simd_float3 float3;
}

So the compiler has the same built-in support for:

  • Basic arithmetic operators for lanewise operations (vector-vector, and vector-scalar);
  • [i] to access i-th element;
  • .x.y.z.w , .xy etc. to access the elements.

Matrix Types

C++ matrix type example (see <simd/matrix_types.h>):

simd::float3x3  // 3x3 matrix of float elements

If you look further, the matrix type inherits the C matrix type with a few constructors added (but nothing else):

// in namespace simd
struct float3x3 : ::simd_float3x3 {
    float3x3() : ::simd_float3x3((simd_float3x3){0}) { }
    float3x3(float diagonal) : float3x3((float3)diagonal) { }
    float3x3(float3 v) : ::simd_float3x3((simd_float3x3){(float3){v.x,0,0}, (float3){0,v.y,0}, (float3){0,0,v.z}}) { }
    float3x3(float3 c0, float3 c1, float3 c2) : ::simd_float3x3((simd_float3x3){c0, c1, c2}) { }
    float3x3(::simd_float3x3 m) : ::simd_float3x3(m) { }
    float3x3(::simd_quatf q) : ::simd_float3x3(::simd_matrix3x3(q)) { }
};

Compared to the C matrix type, the constructors allow initializing the matrix more creatively: filling 0s, creating diagonal matrix, creating from columns, creating from C matrix, etc.

Because it is a thin wrapper over the C matrix, there is still no easy way to access a row vector or sub-matrix.

Vector Construction

Because the C++ vector is basically the same thing as the C vector type, you can use all the C means to initialize the object. There are also C++ helper functions to make vector objects, if you prefer.

simd::float3 f1{1.0, 2.3, 4.5};                   // direct initialization
simd::float3 f2 = simd_make_float3(1, 2, 3.14f);  // C helper function
simd::float4 f3 = simd_make_float4(f2, 1);        // C helper function
simd::float3 f4 = simd::make_float3(1, 2, 3.14f); // C++ helper function
simd::float4 f5 = simd::make_float4(f2, 1);       // C++ helper function

Matrix Construction

Because matrix is a class, you need to call one of the constructors to create a matrix object. For example, initialize through an intermediate C matrix using direct numbers:

simd::double3x3 d3x3{ simd_double3x3 {{
    {1, 0, 0}, // column 0
    {0,-1, 0}, // column 1
    {0, 0,-1}, // column 2
}} };

Initialization with column vectors:

simd::float3x3 f3x3{
    simd_float3{1, 2, 3},       // column 0: from C float3
    simd::float3{4, 5, 6},      // column 1: from C++ float3
    simd::make_float3(7, 8, 9), // column 2: from C++ helper function
};

If you need to construct from row vectors, call the same C helper function:

simd::float3x3 f3x3 = simd_matrix_from_rows(
    simd::float3{1, 2, 3}, // row 0
    simd::float3{4, 5, 6}, // row 1
    simd::float3{7, 8, 9}  // row 2
);

Matrix Operations

With operator overloading, it’s more pleasant to perform matrix operations in C++. Matrix operations can be found in <simd/matrix.h>, for example:

simd::float3 v1{1, 2, 3};
simd::float3x3 m1;
simd::float3 v2 = m1 * v1;      // matrix * vector
simd::float3x3 m2;
simd::float3x3 m3 = m1 * m2;    // matrix * matrix
simd::float3 v3 = m1 * m2 * v2; // matrix * matrix * vector

Conclusion

Apple SIMD library provides fast and simple vector and matrix operations.

Posted in C++ | Tagged: , , , , , , , , , , , | Leave a Comment »

24 Puzzle (Game to Get 24 out of 4 Integers)

Posted by binglongx on February 1, 2025

This a quick cheat if some friends challenge you the 24 puzzle: Run in Compiler explorer: https://godbolt.org/z/6aajvcrx5

The C++ code is certainly not optimized, but written cursorily:

#include <memory>           // std::unique_ptr
#include <optional>         // std::optional
#include <utility>          // std::move
#include <vector>           // std::vector
#include <variant>          // std::variant
#include <cassert>          // assert
#include <iostream>


enum class Operator {
    Add,
    Subtract,
    Multiply,
    Divide
};

struct Expression;

inline void printIndent(std::ostream& os, int indent) {
    for(int i=0; i<indent; ++i) {
        os << "  ";
    }
}

std::ostream& operator<<(std::ostream& os, Operator op) {
    switch(op){
        case Operator::Add:         os << "+"; break;
        case Operator::Subtract:    os << "-"; break;
        case Operator::Multiply:    os << "*"; break;
        case Operator::Divide:      os << "/"; break;
        default:                    assert(false); break;
    }
    return os;
}

struct BinaryExpression {
    std::unique_ptr<Expression> left;
    Operator                    op;
    std::unique_ptr<Expression> right;
    
    BinaryExpression(BinaryExpression&&) = default;
    BinaryExpression(std::unique_ptr<Expression> left, Operator op, std::unique_ptr<Expression> right);
    BinaryExpression clone() const;
    std::optional<int> evaluate() const;
    friend std::ostream& operator<< (std::ostream& os, const BinaryExpression& v);
};

struct Expression {
    std::variant<int, BinaryExpression> expr;   // terminal or binary expression
    
    Expression(BinaryExpression binaryExpr) : expr(std::move(binaryExpr)) {}
    Expression(int terminal) : expr(terminal) {}
    
    std::unique_ptr<Expression> clone() const {
        if( std::holds_alternative<int>(expr) ) {
            return std::make_unique<Expression>(std::get<int>(expr));
        }
        else {
            return std::make_unique<Expression>(std::get<BinaryExpression>(expr).clone());
        }
    }
    
    std::optional<int> evaluate() const {
        return std::holds_alternative<int>(expr) ?
        std::optional{std::get<int>(expr)} : std::get<BinaryExpression>(expr).evaluate();
    }
    
    friend std::ostream& operator<< (std::ostream& os, const Expression& v) {
        return std::holds_alternative<int>(v.expr)? (os << std::get<int>(v.expr)) : (os << std::get<BinaryExpression>(v.expr) );
    }
};

BinaryExpression::BinaryExpression(std::unique_ptr<Expression> left, Operator op, std::unique_ptr<Expression> right)
: left(std::move(left)), op(op), right(std::move(right)) {
}

BinaryExpression BinaryExpression::clone() const {
    return BinaryExpression{ left->clone(), op, right->clone() };
}

std::optional<int> BinaryExpression::evaluate() const {
    auto a = left->evaluate();
    auto b = right->evaluate();
    if( !a || !b ) {
        return {};          // error
    }
    switch(op) {
        case Operator::Add:         return (*a) + (*b);
        case Operator::Subtract:    return (*a) - (*b);
        case Operator::Multiply:    return (*a) * (*b);
        case Operator::Divide: {
            if( (*b) == 0 ) {
                return {};  // divided by 0
            }
            else if( (*a) % (*b) != 0 ) {
                return {};  // has remainder
            }
            else {
                return (*a) / (*b); // good
            }
        }
        default:
            assert(false);  // should not be here.
            return {};
    }
}

std::ostream& operator<< (std::ostream& os, const BinaryExpression& v) {
    return os << "(" << *v.left << v.op << *v.right << ")";
}


std::optional<std::unique_ptr<Expression>> get_expression_for_target(const std::vector<std::unique_ptr<Expression>>& expressions, int target);

// add `ab` to end of `others` and try to shoot target
// if failure, return empty, and restore `others` (for next try later)
// if success, return the valid expression that evaluates to `target`
std::optional<std::unique_ptr<Expression>> get_expression_for_target(std::unique_ptr<Expression> ab, std::vector<std::unique_ptr<Expression>>& others, int target) {
    others.push_back( std::move(ab) );
    if(auto result = get_expression_for_target(others, target)) {
        return result;
    }
    // did not work: revert `others`.
    others.pop_back();
    return {};
}

// try to construct an expression using members in `expressions` exactly once with operators (+,-,*,/) to evaluate to `target`
// if failure, return empty.
// if success, return the valid expression that evaluates to `target`
std::optional<std::unique_ptr<Expression>> get_expression_for_target(const std::vector<std::unique_ptr<Expression>>& expressions, int target) {
    if( expressions.size()==0u ) {
        return {};  // no way
    }
    
    // base case
    if( expressions.size()==1u ) {
        if( auto value = expressions.front()->evaluate(); value && *value == target ) {
            return expressions.front()->clone();
        }
        else {
            return {};  // no result
        }
    }
    
    // reduce to a size-1 problem by combining 2 arbitrary expressions
    for(size_t i=0; i<expressions.size()-1u; ++i) {
        for(size_t j=i+1; j<expressions.size(); ++j) {
            auto& a = expressions[i];
            auto& b = expressions[j];
            
            std::vector<std::unique_ptr<Expression>> others;
            for(size_t k=0; k<expressions.size(); ++k) {
                if( k!=i && k!=j) {
                    others.push_back(expressions[k]->clone());
                }
            }
            
            // a + b
            if(auto result = get_expression_for_target(std::make_unique<Expression>(BinaryExpression(a->clone(), Operator::Add, b->clone())),
                                                       others, target)) {
                return result;
            }
            
            // a - b
            if(auto result = get_expression_for_target(std::make_unique<Expression>(BinaryExpression(a->clone(), Operator::Subtract, b->clone())),
                                                       others, target)) {
                return result;
            }
            
            // b - a
            if(auto result = get_expression_for_target(std::make_unique<Expression>(BinaryExpression(b->clone(), Operator::Subtract, a->clone())),
                                                       others, target)) {
                return result;
            }
            
            // a * b
            if(auto result = get_expression_for_target(std::make_unique<Expression>(BinaryExpression(a->clone(), Operator::Multiply, b->clone())),
                                                       others, target)) {
                return result;
            }
            
            // a / b
            if(auto result = get_expression_for_target(std::make_unique<Expression>(BinaryExpression(a->clone(), Operator::Divide, b->clone())),
                                                       others, target)) {
                return result;
            }
            
            // b / a
            if(auto result = get_expression_for_target(std::make_unique<Expression>(BinaryExpression(b->clone(), Operator::Divide, a->clone())),
                                                       others, target)) {
                return result;
            }
        }
    }
    return {};  // no result
}

std::vector<std::unique_ptr<Expression>> create_expressions(const std::vector<int>& numbers) {
    std::vector<std::unique_ptr<Expression>> expressions;
    for(auto number : numbers) {
        expressions.push_back(std::make_unique<Expression>(number));
    }
    return expressions;
}

void test(int target, const std::vector<int>& numbers) {
    
    std::cout << "Trying to get " << target << " from: ";
    for(auto number : numbers) {
        std::cout << number << " ";
    }
    
    if( auto expr = get_expression_for_target(create_expressions(numbers), target) ) {
        std::cout << "  Success: " << (**expr) << "\n";
    }
    else {
        std::cout << "  Failure: No result\n";
    }
}


int main() {
    test(24, std::vector<int>{1,1,1,1,1});
    test(24, std::vector<int>{2,2,2,2,2});
    test(24, std::vector<int>{3,3,3,3,3});
    test(24, std::vector<int>{4,4,4,4,4});
    test(24, std::vector<int>{5,5,5,5,5});
    test(24, std::vector<int>{6,6,6,6,6});
    test(24, std::vector<int>{7,7,7,7,7});
    test(24, std::vector<int>{8,8,8,8,8});
    test(24, std::vector<int>{9,9,9,9,9});
    return 0;
}

Note that it can handle any length of numbers, not necessorily 4 numbers. The target does not have to be 24 either. Don’t use a lot of numbers; it might be slow as it is doing exhsautive searching.

The testing results above:

Trying to get 24 from: 1 1 1 1 1   Failure: No result
Trying to get 24 from: 2 2 2 2 2   Success: ((2+2)*(2+(2+2)))
Trying to get 24 from: 3 3 3 3 3   Success: ((3+3)+(3*(3+3)))
Trying to get 24 from: 4 4 4 4 4   Success: ((4*(4+4))-(4+4))
Trying to get 24 from: 5 5 5 5 5   Success: (((5*(5*5))-5)/5)
Trying to get 24 from: 6 6 6 6 6   Success: ((6+6)*((6+6)/6))
Trying to get 24 from: 7 7 7 7 7   Failure: No result
Trying to get 24 from: 8 8 8 8 8   Success: ((8+8)-(8-(8+8)))
Trying to get 24 from: 9 9 9 9 9   Failure: No result

Posted in C++ | Tagged: , , , , | Leave a Comment »

Git Submodule

Posted by binglongx on January 31, 2025

Git submodule is very useful when you need to use a different project in the form of source code. You could copy the plain files of that other project into your repo, but then you have the problem of whether they should be added as part of your repo or otherwise how to track them.

In the example below, the repo using a submodule repo is called the outer repo.

Add submodule to a repo

Run git submodule add

From the outer repo, run:

git submodule add <submodule_url> <dir>

e.g.:

git submodule add https://github.com/example/example.git example

This creates a directory example in your repo, which is a submodule referring to https://github.com/example/example.git.

git submodule add basically adds an entry in .gitmodules file in your repo with the URL and directory above. It also immediately clones the files from submodule repo to specified directory.

Now your outer repo can use the files from the submodule repo.

Commit the change

Adding a submodule is a change to the outer repo, so we need to commit it.

git add .gitmodules example/
git commit -m "added submodule"

Notice that not only the entry in .gitmodules is added, but also an index in example/, which basically points to specific commit in the submodule repo. You can think of a submodule is tracked in outer repo by:

  • submodule directory in outer repo,
  • submodule repo URL,
  • submodule commit index.

Any change above needs a commit in the outer repo. A lot of confusion is from the fact that people forget the outer repo points to a specific commit in submodule repo, unless it’s updated.

Now, the outer repo is equiped with a submodule on your local computer. You likely also push the change to the remote repo of your outer repo.

Clone git repo with submodules

Now other folks need to work on your repo. They will clone your repo:

git clone /url/to/repo/with/submodules

Note that this does not automatically pull the files from submodules in this repo.

git submodule init

They first need to run

git submodule init

git submodule init copies the mapping in .gitmodules into the local .git/config file.

git submodule update

Then they need to run git submodule update to fetch the specific commit from the submodule repo. This will pull files from the submodule repo.

Note that, this does not pull the latest commit from the submodule repo.

Work in submodule

If you cd into the submodule directory, git assumes you now work on the submodule. All the git commands will be regarding the submodule, like it forgets the outer repo. You can change branch, make changes, commit, push etc., like that it is just a normal git repo.

If you cd back to the parent directory, git comes back to your outer repo.

Use a different commit in submodule

You may need to use a different commit for the submodule, for example, when some new work is done in the submodule’s remote repo.

You can cd to the submodule directory, do a checkout and pull.

When you cd back to the parent directory, git status tells you that submodule index has changed, and that is considered a change in the outer repo. You commit (and push) this change (little change), so the outer repo tracks the new index of submodule repo.

Keep submodule up-to-date

If you let your submodule track a specific commit, its HEAD may become detached.

It’s easier to let the submodule to stay in the main branch of the corresponding git repo, and whenever it needs to use the latest from the repo, just pull.

$ cd my_submodule
$ git checkout main
$ git pull

References

Posted in C++ | Tagged: , , , , | Leave a Comment »

Choose macOS Display Resolution

Posted by binglongx on December 26, 2024

Introduction

For most high-quality displays connected to a Mac, macOS automatically detects and sets appropriate resolution, and your adjustment is normally unnecessary.

However, there are situations where you may notice the displayed content looks odd, for example, UI elements like menu text or buttons may appear too small or sometimes blurry. In such cases, you might need to go into the System Settings app and choose a different resolution under Displays.

Concepts

Before you change the display resolution, let’s sort out some concepts.

Physical Resolution and DPI / PPI

A display has physical resolution, i.e., how many native pixels in width and height directions. For example, a 5K display has 5120×2880 pixels.

A display also has physical size. For example, a 27-inch display has the diagonal length of about 27 inches.

The pixels are arranged in square arrays, so a display has density of pixels same in both directions, expressed in pixels per inch (ppi) or dots per inch (dpi). For example, a 5K 27-inch display is 218 dpi/ppi. The higher the dpi, the finer a pixel is, and the sharper the display can show details.

Points

From perspective of app developers, the display, or a screen, is the area where UI elements can be drawn. When designing a macOS app, UI elements are specified in terms of points. For example, a button may be specified as 50×50 pts. In apps like Keynote, you specify text size in points too, e.g. 36 pts. These points represent logical size of UI elements.

Logical Resolution

In the past, a standard Macintosh display has 72 dpi. This means that 36-pt text rendered to this display without any scaling would take 0.5-inch height in physical screen.

As you see, today’s displays have way higher dpi, e.g. 218 dpi.

If the same UI designed for older display is rendered to newer high DPI display the same way, the UI elements would be extremely small (about 1/3 physical size on display in the example above). The UI is basically impossible to read or interact.

To prevent this issue, modern macOS does not map UI points directly to physical pixels in display. The apps still express UI using points. macOS provides a logical display of certain size in terms of points. Below the hood, macOS maps the logical display to the physical display.

Scaling

Mapping the logical points to onscreen physical pixels is called scaling.

macOS always knows the exact physical resolution of the display theoretically. macOS renders UI elements and vector graphics such that the graphic primitives like lines are using full physical resolution, therefore as sharp as possible.

Scaling is automatic, and app developers normally don’t need to intervene. It’s however possible to learn the scaling factor. Note that, if your app uses scaling factor, the scaling factor can be dynamic, for example, when a window is moved from one display to another display, their dpi might be different, so is the scaling factor.

For bitmaps such as icons, unlike vector graphics, automatic scaling may not work very well, and Apple guideline suggests developers provide multiple bitmaps of different pixels sizes / dpis, so macOS can choose the most appropriate one to render for different physical displays.

When scaling is applied, the logical points per inch (lppi) differs from physical pixels per inch (pppi). The ratio of them is the scaling factor.

Choose Display Resolution

With the concepts above in mind, let’s talk about choosing the display resolution.

As macOS always knows the physical pixel resolution of display theoretically, in the System Setting app | Displays, you are really choosing logical resolution (in points), not physical resolution.

The goal is to balance several factors:

  • Logical size of real estate of the screen
  • Physical size of UI elements in screen
  • Sharpness of rendered details

At a given display and viewing distance, choosing a higher logical resolution means a larger logical screen. Therefore the same physical screen can house more UI elements and contents represented in logical points. This means you can have more windows or dialogs in the screen. But each UI element would appear physically smaller, may become harder to see or choose. You could potentially see sharper details of the rendering.

Conversely, if you use a low logical resolution, the logical screen is smaller. The screen then cannot show a lot of UI elements, and each UI element can appear bigger. This can make seeing or interacting with UI easier, but you may have to scroll more often to see other UI elements. If you use too low a logical resolution, you may see coarse details of the screen rendering.

For the 5K 27-inch display, this is the result of using 5120×2880 logical resolution (same as physical resolution):

And this is the result of using 2560×1440 logical resolution (half of physical resolution):

And this is using even lower 1280×720 logical resolution (1/4 of physical resolution):

For my viewing distance of about 75cm, 5120×2880 logical resolution results in too little text size that is hard to read, and 1280×720 logical resolution ends up with too little content showing up and wasting my screen estate. 2560×1440 logical resolution is a good balance, and the contents are also sharp.

A simple calculation for a 218 pppi 5120×2880 display:

  • A) 5120×2880 logical resolution: 218 lppi
  • B) 2560×1440 logical resolution: 109 lppi
  • C) 1280×720 logical resolution: 55 lppi

B)’s 109 lppi would be closer to standard 72 lppi (from old day UI design guideline) than A)’s 218 lpp. Most apps designed using points would render with reasonable size for UI elements. For example, 36-pt text would use 0.33 inches at 109 pt/inch. This is smaller than 0.5 inches when the app was designed for 72-dpi display. But if you use logical resolution as the same to physical resolution 5120×2880, it would take 0.165 inches, which would be too hard to read as intended.

Obviously, if the display’s physical size is larger, or if your viewing distance is different, you may need to use a different logical resolution even for the same 5K physical resolution.

Conclusion

It is not necessary to choose the logical resolution that matches the physical resolution to get sharp rendering.

A general rule of thumb is to pick among 1x, or half, or rarely 1/4 of physical resolution, which results in close to or slightly larger than 72 lppi for normal viewing. This is because macOS scaling works best for integral 2x or 4x ratios.

macOS also offers other scaling options (like 2880×1620 logical resolution for 5120×2880 display). They are not ideal scaling but still provide usable experience. Feel free to experiment and choose the one that looks and feels best to you.

References

Posted in Computer and Internet, Uncategorized | Tagged: , , , , , , , , , , , , , , | Leave a Comment »

C++ Type Erasure

Posted by binglongx on November 16, 2024

Excellant videos:

Basic ideas in the examples:

  • Create a class W to wrap the concrete types.
  • W constructor captures concrete type information.
    • W has templated constructor, so the constructor has the knowledge of the concrete type T. This information is used to perform operations that need/depend on T, while still in the W constructor. Approaches to capture the type information:
      • Approach 1: Create an internal base class B, and a class template parameterized by the concrete type but deriving from the base, D<T>:B.
        • B has virtual methods to dictate the oprations;
        • D implements the operations with type information of T.
        • W creates a new D object, e.g., moving from t in W::W(T t). It stores a pointer (e.g. std::unique_ptr<B>) as data member.
          • W operations forward to B operations using the pointer member above.
        • If it is too expensive even moving T, W may create a non-owing reference to t in W::W(T& t), which can be captured in B and/or D.
        • If you need to capture other information to customize W, use extra parameters in W::W(), either as template parameter or function parameter, for compile time or run-time customized behavior. An example is to pass a lambda to customize the operation.
        • If dynamic allocation to create D is too expensive, W can use use small buffer optimization (SBO) to move T over directly if it is a small type. It’s even possible to use a storage policy template parameter to customize W behavior, e.g. to always use dynamic allocation, to always use SBO, or to use SBO with fallback to dynamic allocation.
      • Approach 2: W Constructor can create a lambda L and store it as data member, whose body uses the T information, e.g., calling a function depending on T.
  • After the construction, W no long knows the concrete T type (type erased). It is a plain wrapper class object in appearance, and you cannot ask what’s the concrete it wraps.
  • Operations on the W object rely on the internal B member or L member to perform.
  • D or L‘s operations can connect to T in different ways:
    • External polymorphism: D/L assumes a free function override that takes T object, the affordance function. As long as someone writes such the affordance, W would work with T, otherwise it would have a compile error. Note that even if you are not able to modify T, you can still make use of W by creating the affordance override.
    • D/L assumes T has a specific method to perform an action. This is not always possible if you don’t control T.

A beautiful type erasure can represent the unrelated types with value semantics and have high performance.

Note that type erasure must use indirection (to hide “type”), which has similar performance loss like vtable, compared to class or function template that exposes type or implementation details.

Maybe we can create utitily class template for type erasure supporting:

  • Concrete type object access
    • Referencing (non-owning)
    • Moving
    • Copying
  • Concrete type operation access (e.g. using C++20 concept)
    • External polymorphism / free affordance function override; and/or
    • requiring specific member function signature

Posted in C++ | Tagged: , , , , , , , , , | Leave a Comment »